Status Sidebar
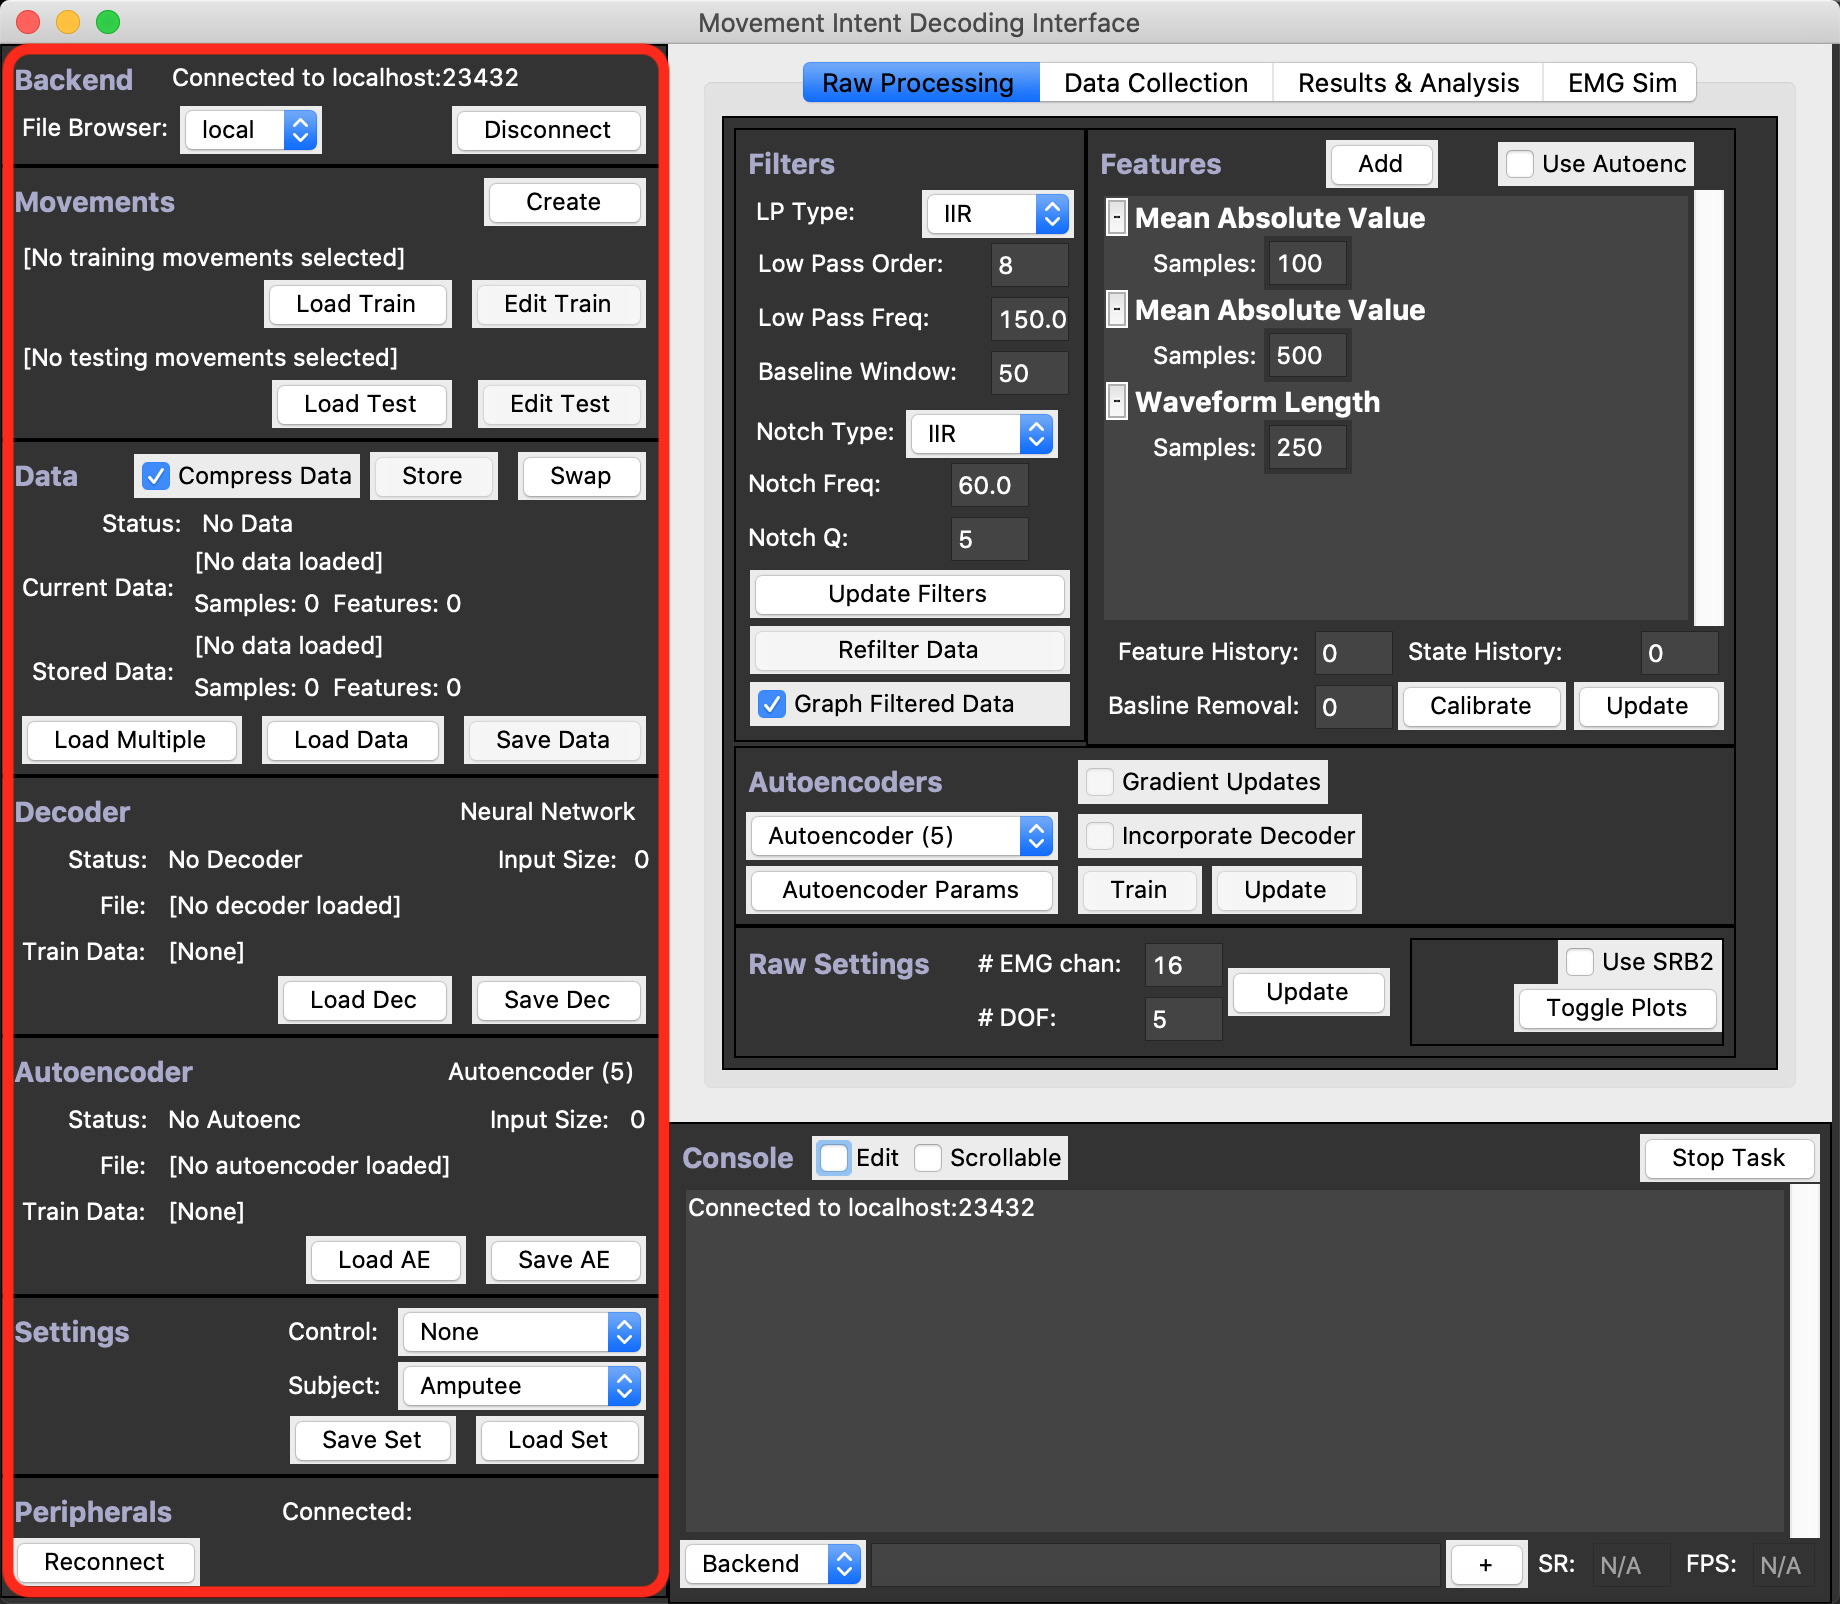
The side bar of the GUI, as highlighted in red below, holds the status of most of the loadable and saveable objects, as well as buttons to Load/Save those corresponding objects. Let’s go through the contents from top to bottom. We’ll call each of the faintly highlighted boxes with titles “Frames”, and we’ll discuss each one in turn.

Backend Status Frame
This Frame shows the status of any connected backend in the form of the IP:PORT.
The Disconnect Button changes to a Connect Button whenever the GUI is not connected to a Backend,
allowing you to enter a new IP:PORT combination.
The File Browser Dropdown let’s you select whether to use the file browser of the local computer the GUI is running on,
or a remote file browser on the machine the Backend is running on.
Note that files can only be loaded from the Backend, so be sure to use the Remote file browser whenever you are using a Backend running remotely.
Movements Status Frame
This Frame lets the user Load or Edit movement configuration files for Training and Testing.
These movement config files should be .json files containing a list of movements.
The sample config of a single movement is shown below with comments.
{
    "rep" : 5,  // The number of repetitions of the movement
    "max_amp" : [1,1,1,1,1],  // The desired maximum amplitude of each DOF during the movement
    "raising_time" : 0.5,  // The time in seconds to go from rest to maximum amplitude
    "holding_time" : 0.5  // The time in seconds to hold the maximum amplitude
}
The Edit Train and Edit Test Buttons allow you to edit the movement configurations in the GUI,
but feel free to use your own text editor as well.
These movement configurations are necessary when performing online testing with an actual subject
when not using another movement prompt source, such as the Glove Peripheral.
Data Status Frame
This frame holds the status of any loaded, recorded, saved, or editing Data,
as well as the functionality to Load and Save Data.
The first thing to notice is the Compress Data Checkbox which allows you to saved data in compressed .pickle files,
as opposed to the readable but inefficient .json file format.
The Store and Swap Buttons allow you to hold 2 Datasets in memory.
You can Store a currently-loaded Dataset, then Load a new one, and then Swap between the two however you like.
Accordingly, the status of the Current and Stored Datasets is shown in this Frame as well, such as the number of time samples in the dataset, and the number of computed Features.
Below the Data Statuses, is the standard Loading and Saving functionality.
The Load Data Button creates a popup that allows you to select precisely what data you wish to load,
and the Save Data Button simply allows you save the currently loaded Data.
The Load Multiple Buttons allows to load data from multiple files by concatenating them.
Decoder Status Frame
This Frame holds the status of the current decoder.
In the top right of this Frame, the type of Decoder is printed - in this case a Neural Network.
Below that, we have the status of any trained Decoder, the input size of said trained Decoder, as well as the file path to wherever the Decoder was loaded to or saved from and the file path to the data used to train the decoder.
Lastly, we simply have Load Decoder and Save Decoder Buttons that bring up either the Local or Remote File Explorer.
Autoencoder Status Frame
This Frame is basically identical to the Decoder Status Frame, but references the current Autoencoder instead.
Settings Status Frame
This Frame allows you to select the Control and Subject modes via the two dropdowns, and also lets you load and save settings to/from .json files.
The valid Control Modes are:
Mujuco Hand: This outputs the prosthetic control signals to the Mujoco Physics Simulator, which must be connected as a Peripheral.Robotic Hand: This outputs prosthetic control to a robotic hand over a Serial USB port.Columns: When the--plotcommand line argument is supplied, this pulls up a separate window containing columns representing the position of all DOFs.None: No output device is selected.
The valid ‘Subject’ Modes are:
Amputee: This simply states that no device will be used that can specify the actual position of the DOFs.Intact: This specifies that the user will be wearing a Glove Peripheral providing the real time positions of all the DOFs.
Peripherals Status Frame
This Frame lets you connect to any defined Peripheral devices.
Simply press the Reconnect Button, and select the Peripheral device(s) you’d wish to connect to.
You can also deselect already-connected Peripherals to disconnect from them.
Here’s a list of the currently available Peripherals:
OpenBCI_WiFi: This connects the OpenBCI WiFi Board used to record EMG signals. Make sure the OpenBCI Board is ON and connected to your computer over WiFi.OLD_OpenBCI: This is the deprecated software interface to the OpenBCI WiFi Board.Glove: This is the wearable glove connected via USB. You may need to edit the ‘glove_port’ setting to properly discover the Glove.Mujoco: This connects the Mujoco Physics Simulator as anControlDevice. To connect, first start Mujoco on the same machine as the Backend (the Windows executable of Mujoco is included in this repo atperipherals/mujoco/program/mjhaptix.exe), and then load either theMPL_Ghost.xmlorMPL_Ghost_Left.xmlmodel files.Robot: This connects to a robotic hand over Serial USB. You may need to edit therobot_portsetting to properly discover the hand.Utah: This connects to University of Utah’s Matlab & Labview -based Decoding Software. Using this is complicated and still buggy, so please contact the developers if you wish to use this feature.